


For good reason, Webflow is gradually growing in popularity among web designers.
The CMS offers full visual design control, clean code, and lightning-fast performance.
According to W3techs, 1.2% of all CMS-based websites (roughly 500K) use Webflow.
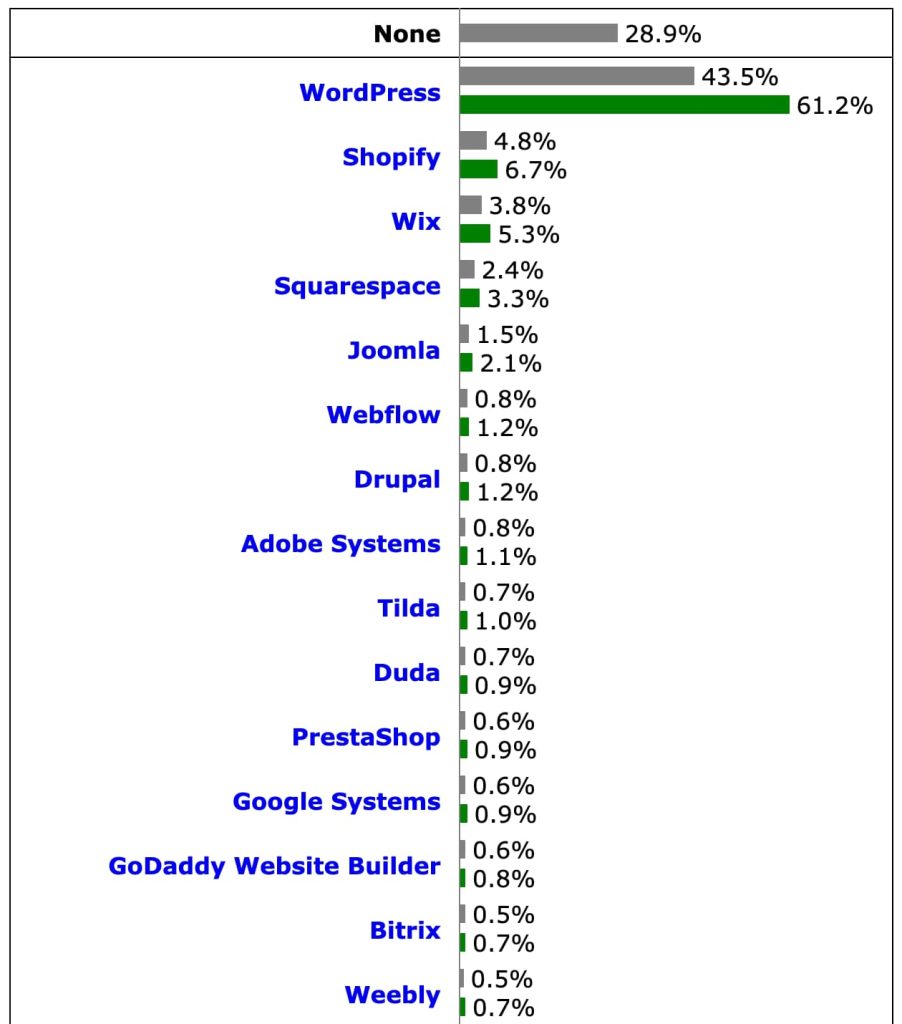
That figure might sound small compared to a CMS giant like WordPress.
However, their market share is growing fast, especially as modern brands seek design flexibility without sacrificing speed.
While Webflow makes it easy to build stunning websites, optimizing for search still requires intentional effort.
The good news? Most of what you need is already built in.
Below, I’ll walk you through the Webflow SEO essentials that every website owner should know, whether you’re launching a blog or running a design portfolio.
Technical SEO
Technical SEO in Webflow mostly comes down to knowing where the relevant settings are and using them correctly.
Here are the essentials you need to focus on.
robots.txt
I read somewhere that robots.txt is the most important file in SEO and I silently agree.
This file provides search engines and LLMs with guidelines on what pages they should/shouldn’t crawl.
Every website has a robots.txt file. To check for yours, go to:
yourwebsite.com/robots.txt
Setting up your robots.txt is essential in Webflow sites because it tells Google to “crawl this page” or “ignore this page.”
For example, maybe you have a thank-you page that you don’t want to show up in Google search results. You can block it through your robots.txt file by adding something like:
User-agent: *
Disallow: /thank-you
This rule tells Google (and all other search crawlers/LLMs) to crawl all web pages but ignore the /thank-you/ page.
To get this done in Webflow, go to Site Settings > SEO > robots.txt
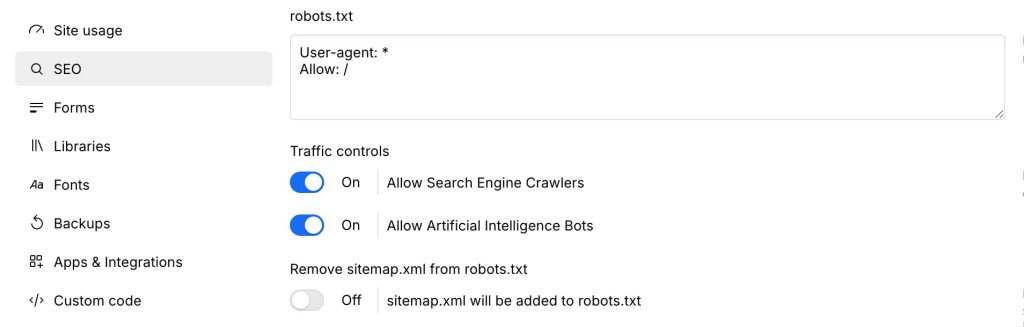
It’s a small setup but keeps your site clean and focused.
XML Sitemap
An XML sitemap is like a roadmap for search engines. It lists all the pages you want indexed on your site.
Luckily, Webflow auto-generates a sitemap.xml for you.
To turn this on, visit Site Settings > SEO > Sitemap
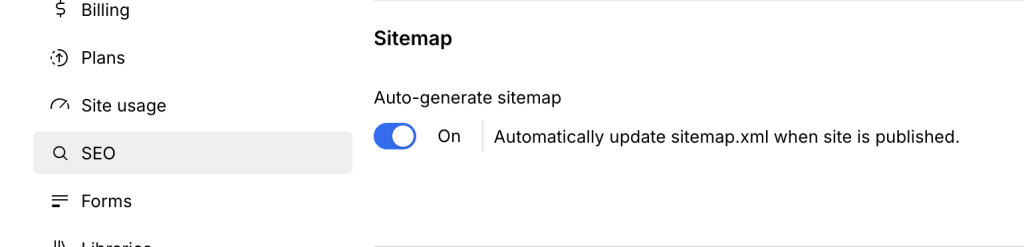
Ensure the Auto-generate sitemap option is enabled, then save and publish the website.
Now, Webflow automatically updates your sitemap whenever you publish your site. You can view it at:
yourwebsite.com/sitemap.xml
Sometimes, this automatic sitemap includes junk pages you might not want to appear in search results.
You can also toggle sitemap generation off and upload your own. Or use the default and just make sure you’re not indexing junk pages.
Don’t index login pages, admin pages, duplicates, or drafts. Keep your sitemap tidy. Also, remember you still need to submit your sitemap to Google for it to be recognised.
Structured Data (aka Schema Markup)
Structured data is extra info that helps Google understand your content better.
Unlike WordPress, Webflow doesn’t have a robust plugin ecosystem to handle structured data automatically.
So if you want rich results (like FAQs, reviews, stars, or event info, etc.) in search results, you’ll need to do it manually.
Here’s how:
- Use a free schema generator to generate structured data for the result you want to achieve
- Copy the code it gives you
- Paste it into the Page Settings > Custom Code > Before the head
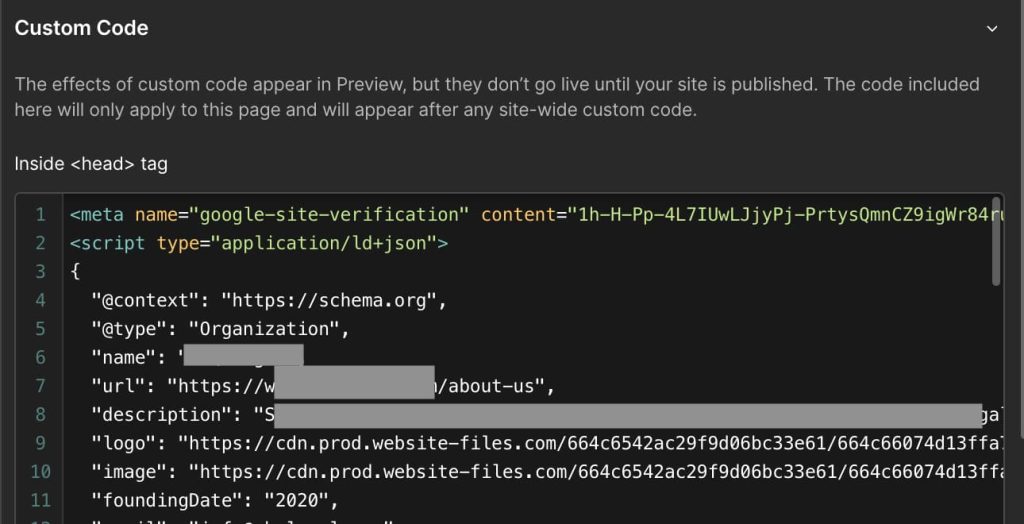
A little extra work but pays off in better search visibility.
Global Canonical Tag URL
Webflow makes it easy to set a default Global Canonical Tag URL across your entire site.
So, what does this option do?
It automatically adds a rel=”canonical” tag to the section of every page using the domain you provide. This tag tells Google: “Hey, this is the main version of this page. Ignore the others.”
Why is that important?
Because sometimes, your site shows the same page through multiple URLs.
You can set this up in Webflow by going to Site Settings > SEO tab >> Global Canonical Tag URL
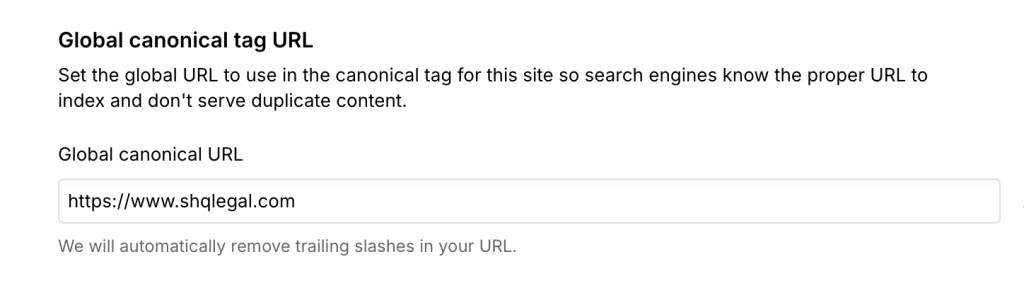
Here, you’ll enter your main domain without the trailing slash:
https://www.yourwebsite.com
Once that’s in place, Webflow will generate canonical tags on every page.
Without setting this global field, Webflow won’t include any canonical tags on your site. That means Google has no clue which version of your URLs is the “main” one, and this leads to duplicate content issues.
So always set your Global Canonical Tag URL.
Manage Indexing
By default, Webflow lets Google index every page. But sometimes, you want to keep certain pages private.
Luckily, each page in Webflow has a toggle to index or no-index it.
Essentially, you should:
- Keep index on for blog posts, service pages, and core website content
- Turn it off for thank you pages, landing pages with duplicate content, test pages, admin pages, or anything not meant for visitors
You can easily control indexing by going to Page Settings > SEO Settings > Sitemap Indexing

Turn it off if you don’t want the page to be in search.
Technical SEO doesn’t have to be scary. In Webflow, most of it is just toggling on/off, checking boxes, and pasting in the right code.
And once it’s set, you’re good to go.
On-Page SEO
Once your technical foundation is solid, it’s time to tackle the stuff users and search engines actually see on your site.
Webflow gives you full control over this.
Here’s what to focus on.
Title Tags & Meta Descriptions
Your title tag is the clickable headline that appears in Google search results.
Your meta description is the short blurb underneath.
Both are super important, as they help real people decide whether to click and assist search engines in understanding your content.
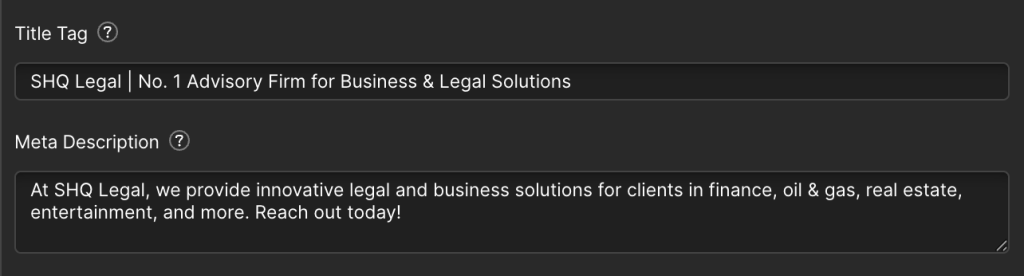
To set them in Webflow, go to the page you want to edit and Page Settings > SEO Settings
- Add your Title Tag (keep it under 60 characters)
- Add your Meta Description (aim for 150–160 characters)
Infuse keywords naturally and make it clear what the page is about. You want your page content to sound human not robotic.
Heading Hierarchy (H1–H6)
Headings tell search engines how your content is structured.
Here’s what I typically advise:
- Use H1 once for your main page title
- Use H2s for major sections
- Use H3–H6 for subheadings nested under the H2 sections (as when needed)
In Webflow, you can set heading types directly in the element settings.
Alt Texts
Every image on your site should ideally have a descriptive file name and alt text (alternative text).
Alt text is a short description of an image that is not usually visible on the page, but it serves two important purposes:
- Accessibility: Screen readers use alt text to describe images to people who are blind or visually impaired. So if someone can’t see the image, the alt text tells them what it shows.
- Image SEO: Search engines can’t “see” images like we do so alt text helps them understand what the image is about. This can help your images (and pages) rank better in search results.
How to add it in Webflow:
Select your image.

And in the settings panel, fill in the Alt Text field.
Use clear, descriptive language like “african woman holding potted plant” instead of “IMG_0345”. And don’t stuff keywords.
Clean URLs
Keep your URLs short, readable, and keyword-friendly.
Good: yourwebsite.com/plant-care
Not good: yourwebsite.com/page?id=93823
Webflow makes it easy to customize your page slug in Page Settings.
Just edit the URL Slug field.
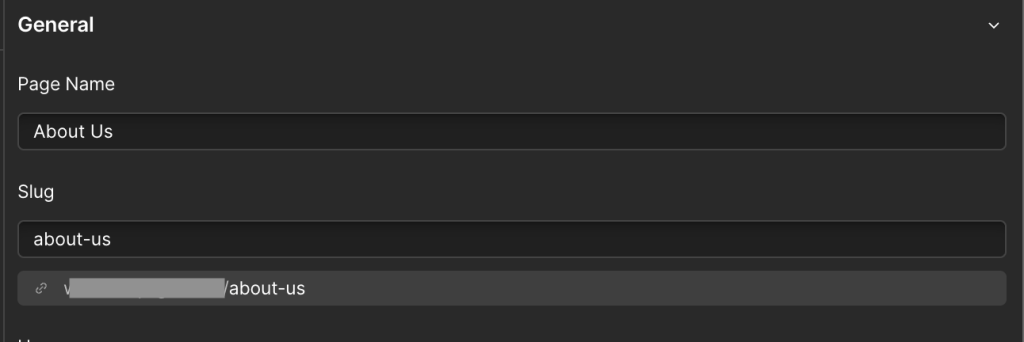
And remember what I mentioned earlier about canonicals. Webflow will automatically add canonical tags if you’ve set up the Global Canonical Tag URL.
This helps search engines know the “official” version of any page, even if a visitor lands there through tracking links or filtered URLs.
Implementing these small on-page SEO tweaks adds up and gives your Webflow site a solid shot at better rankings.
Tools & Integrations for Webflow SEO
Webflow gives you a lot of SEO control out of the box.
But you should still pair it with the right extra tools to make everything easier.
Google Search Console
Google Search Console (GSC) helps you see how your site appears in search results.
You also get to track what keywords people use to find you, spot indexing or mobile usability issues, and submit your sitemap.
How to connect it:
- Go to Google Search Console
- Add your Webflow site as a property
- Verify ownership (easiest with the HTML tag method in your Webflow project settings under Custom Code)
Once connected, you’ll get real data on how Google sees your site.
Google Analytics
Want to track who’s visiting your site, where they’re from, and what they’re doing?
Google Analytics gives you that insight.
How to set it up:
- Create a free GA account
- Grab your Measurement ID
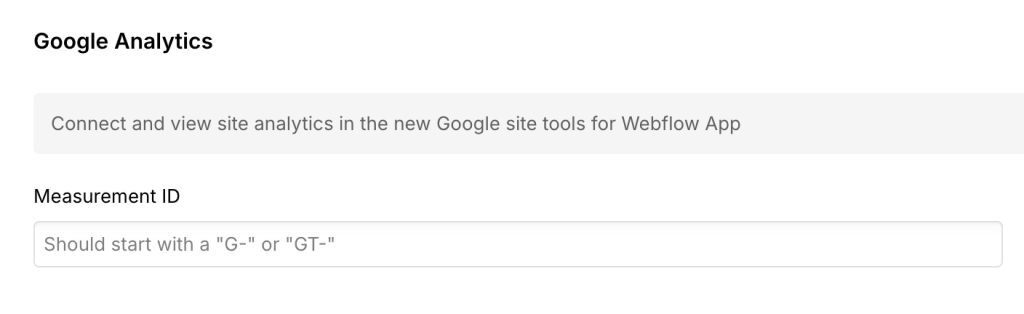
- Paste it into Webflow > Site Settings > Apps & Integrations > Google Analytics
From there, you can track traffic, see which pages perform best, and understand your audience better.
SEO Audit Tools
These SEO audit tools aren’t built into Webflow, but they’re powerful for checking how your site’s doing overall.
They include Ahrefs, Semrush, Ubersuggest, and more.
Having any of these tool will help you:
- Find broken links
- Track keyword rankings
- Spy on competitors
- Discover content ideas
Final thoughts
Webflow is a powerful CMS platform that offers full design freedom.
When paired with the right Webflow SEO practices, it’s more than just pretty. It performs.
You don’t need to be an SEO pro or developer to get started. With just a bit of know-how, you can set up a Webflow site that’s crawlable, indexable, and optimized to show up in search.
If you found this guide helpful, kindly share or drop a comment.
And if you need help with Webflow SEO, feel free to reach out.